 When I ordered my Gotek, the seller’s listing said that you could also order an optional LCD display for something like $7. However, when I contacted him, he said that he was out.
I ended up ordering this basic 16×2 I2C LCD from Amazon for only about $8.
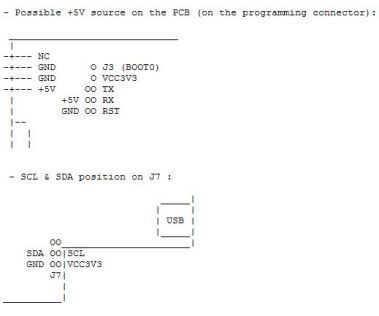 Like everything else with this little project, I had to search for the instructions on how to do this, but it was right under my nose- there was an ASCII diagram in the firmware release notes. There was also a link to a more detailed diagram at http://hxc2001.com.

I drew up a diagram that shows just the connections shown in the ASCII version since that’s all that I needed.
 All you have to do is connect the SDA and SCL pins of the LCD to the SDA and SCL pins of the J7 connector on the Gotek and add 2 pullup resistors.
The J7 connector is the display port where the LED display was already attached. When you look at J7 straight on, SDA is the top pin, and SCL is the bottom pin.

The pullup resistors are both 4.7K and are connected between the +5V and each of the SDA and SDL lines.
A good place to access +5V is the programming port on the Gotek, which is labeled J3.
You will also need to wire the +5V and GND pins of the LCD board to the Gotek. Again, a good place to do this is at the programing port.

This is my LCD after I soldered the included board onto it. +5, GND, SDA and SCL are circled in yellow.

With a LCD installed on the Gotek, you can use it in ‘normal’ mode. This requires a 3rd button, so you need to add one. This is pretty easy- all you have to do is connect a push button to the two pins of the JA connector.
You also need to copy the config file from the ‘normal mode’ folder of the firmware (Located at Config_Files\Normal_mode\HXCSDFE.CFG) to the root of your USB drive.
In normal mode, you browse forward and backwards using the original two buttons on the Gotek. You then select the disk image that you want to load using the third button that you installed. Normal mode also allows you to name your files anything you want- you do not have to stick to the naming convention that you had to use in ‘index mode’.

This is what my Gotek looked like when I was finished. I’m going to temporarily mount it back in the case that it came in with the LCD and new button mounted on top. I eventually plan on moving it all into my PEB and mounting the the LCD and buttons on the front. I’ll post some pics when I get that done.
 I recently purchased a Gotek floppy emulator to use with my TI-99/4A. The idea behind the emulator is to, of course, replace the floppy drive on the TI. Well, I’m not going to physically replace the drive- I’m going to use the emulator along with my existing 5.25″ floppy drive to load programs from from disk images onto the computer.
 For my drive with only the basic LED display, I needed to use the indexed configuration file. After doing a full format on my thumb drive, I copied HXCSDFE.CFG from the indexed mode folder of the firmware into the root of the thumb drive. With indexed mode, disk images have to be named in the following manner: DSKA0000.HFE, DSKA0001.HFE, DSKA0002.HFE, etc. Using the buttons on the front of the Gotek, you can page through available images and the file number is displayed on the LED as 00, 01, 02, etc until you choose the one you want.