 The Pocket Chip is a neat little Linux-based computer. I ‘bought’ one during their Kickstarter campaign, and it showed up a few weeks ago. I wanted to see if I could install a TI99 emulator on it, and after a little bit of Googling, I found this page on the Pocket chip forums. User romanaThree had already installed Marc Rousseau’s TI-99/Sim on their Pocket Chip.
I’m not exactly a Linux expert, but I can usually figure enough out to get whatever I’m messing around with done. I could have just linked to romonaThree’s post, but I wanted to post a little about some of the other steps I had to go through to get this working.

The first step was to download the arm version of TI-99/Sim. I then needed to get the TI-99/Sim tar file over to the Pocket Chip (PC). I already had the PC connected to my home wifi, and I needed to figure out the IP address so I could connect to it. I opened up terminal on the PC, and typed the following: ip addr show
I then used Putty to transfer the file over to the PC. Once you open up Putty, you need to enter the IP address of the PC, the username (default is root), and the password (default is chip). I used Putty to create a directory named TI99 in the usr directory, and then transferred TI-99/Sim there.
In terminal on the PC, navigate to the /usr directory. Typing ls will give you a directory listing. CD directory_name will change to the directory that you listed as directory_name. To move up one directory, type CD ..
Once you’re in the TI99 directory, you unzip the tar file by typing: tar xf ti99sim-0.13.0.armhf.tar.gz
TI-99/Sim will need the TI roms. They are in this file, which was found in The GP2X Archive on openhandhelds.org.
For cartridges, use this file. It was found on ZX-81’s site.
When you unzipped TI99/Sim, it created a folder in the usr directory called ti99sim-0.14.0. After unzipping the ROM and cartridge files on your computer, use PUTTY to transfer them into the /bin folder that’s located in the ti99sim-0.14.0 folder.
To run TI-99/Sim, type:
./ti99sim-sdl parsec.ctg (assuming you want to play Parsec)

 I’m a big nerd, so I set up a little photo session with a couple of my TI computers and some Christmas lights last year. They might make a nice Christmas desktop on your computer.
 When I ordered my Gotek, the seller’s listing said that you could also order an optional LCD display for something like $7. However, when I contacted him, he said that he was out.
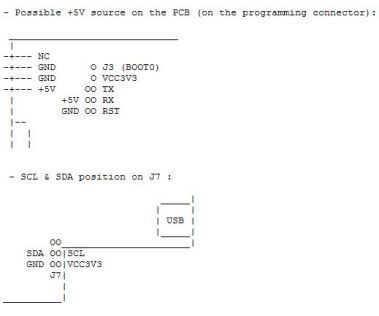 Like everything else with this little project, I had to search for the instructions on how to do this, but it was right under my nose- there was an ASCII diagram in the firmware release notes. There was also a link to a more detailed diagram at http://hxc2001.com.
 All you have to do is connect the SDA and SCL pins of the LCD to the SDA and SCL pins of the J7 connector on the Gotek and add 2 pullup resistors.


 I recently purchased a Gotek floppy emulator to use with my TI-99/4A. The idea behind the emulator is to, of course, replace the floppy drive on the TI. Well, I’m not going to physically replace the drive- I’m going to use the emulator along with my existing 5.25″ floppy drive to load programs from from disk images onto the computer.
 For my drive with only the basic LED display, I needed to use the indexed configuration file. After doing a full format on my thumb drive, I copied HXCSDFE.CFG from the indexed mode folder of the firmware into the root of the thumb drive. With indexed mode, disk images have to be named in the following manner: DSKA0000.HFE, DSKA0001.HFE, DSKA0002.HFE, etc. Using the buttons on the front of the Gotek, you can page through available images and the file number is displayed on the LED as 00, 01, 02, etc until you choose the one you want.

